Here are my instructions for creating a FreeNAS Jail with Transmission running inside it. This uses no FreeNAS plugins whatsoever and takes full advantage of all the power that comes with having a FreeBSD core running at the heart of FreeNAS 8.3.
Please note that if you already followed my guide for installing Serviio you can start from item 8.9. below.
- Install a plugin Jail as per the instructions available on the FreeNAS wiki here and start the Jail running.
- Create a user on your FreeNAS for yourself, e.g. MYUSER
- Enable SSH on your FreeNAS and SSH into your FreeNAS install using your client of choice.
- Execute the following commands:
- SU root
- jexec 1 csh
- mkdir /home
- adduser
- When prompted by adduser follow the instructions on-screen to create a user that matches the user you created in Step 2. Make sure that the Uid matches the user you created in Step 2. If you are not sure what the Uid number is then look it up in the FreeNAS control panel. Here’s the example:
- Username: MYUSER
Full name: MYUSER
Uid (Leave empty for default): 1111
Login group [MYUSER]:
Login group is MYUSER. Invite MYUSER into other groups? []: wheel
Login class [default]:
Shell (sh csh tcsh nologin) [sh]: csh
Home directory [/home/MYUSER]:
Home directory permissions (Leave empty for default):
Use password-based authentication? [yes]:
Use an empty password? (yes/no) [no]:
Use a random password? (yes/no) [no]:
Enter password:
Enter password again:
Lock out the account after creation? [no]:Username : MYUSER
Password : *****
Full Name : MYUSER
Uid : 1111
Class :
Groups : MYUSER wheel
Home : /home/MYUSER
Home Mode :
Shell : /bin/csh
Locked : no
OK? (yes/no): yes
adduser: INFO: Successfully added (MYUSER) to the user database.
Add another user? (yes/no): no
Goodbye!
- Username: MYUSER
- Now we need to leave the jail and create a bridge between the FreeNAS internals and the jail. So logout of your SSH client and then turn off the jail in FreeNAS control panel. Then navigate to Services -> Plugins -> Management -> Mount Points and add a new mount point. Map a directory you can access regularly through FreeNAS as the directory /home/MYUSER within the jail. Turn the jail back on and restart your FreeNAS.
- SSH into your FreeNAS install using your client of choice.
- Execute the following commands [NB: This section will take some time to complete so set aside half an hour]:
- SU root
- jexec 1 csh
- portsnap fetch extract update
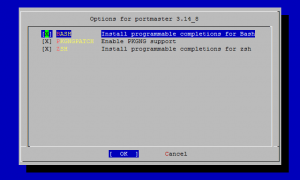
- cd /usr/ports/ports-mgmt/portmaster/ && make install clean
Be sure to use the appropriate options for your system. If you’re not sure, check all the boxes.
- echo ‘WITH_PKGNG=yes’ >> /etc/make.conf
- rehash
- pkg2ng
- portmaster -G editors/nano
- rehash
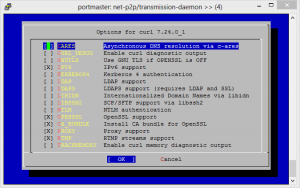
- cd /usr/ports/ftp/curl
- Set the options so that they match the screenshot below:
- portmaster -G net-p2p/transmission-daemon
- mkdir /home/MYUSER/transmission
- mkdir /home/MYUSER/transmission/watch
- mkdir /home/MYUSER/transmission/complete
- nano /etc/rc.conf and add lines:
transmission_enable=”YES”
transmission_watch_dir=”/home/MYUSER/transmission/watch”
transmission_conf_dir=”/home/MYUSER/transmission”
transmission_download_dir=”/home/MYUSER/transmission/complete”
transmission_user=”MYUSER” - rehash
- service transmission start
- You’re done. Transmission will now start-up on every boot. Login to it remotely and set up the directories you need as necessary!

