Sonic 2

Sonic 2 is back, with all new levels,OH MY GOD, OH MY GOD, OH MY GOD, OH MY GOD, OH MY GOD, OH MY GOD, OH MY GOD, OH MY GOD!

Don’t even thing about it, just go here to read about how awesome SEGA are then just buy the damn game already!

image

FreeNAS Jail with Bittorrent Sync

Here are my instructions for creating a FreeNAS Jail with Bittorrent Sync (BTsync) running inside it. This uses no FreeNAS plugins whatsoever and takes full advantage of all the power that comes with having a FreeBSD core running at the heart of FreeNAS 9.1.  This has been done on FreeNAS-9.1.1-RELEASE-x64.

  1. Login to your FreeNAS systems web interface.
  2. Click: Jails
  3. Click: Add Jail
    0001
  4. For Jail Name use btsync and click ok.  Let FreeNAS do its thing.
    0002
  5. The jail will automatically start.  You now need to SSH into your FreeNAS box as root.  In the alternative SSH in as a regular user and then change to root with su.
  6. Run: jls
  7. Make a note of the number to the left of the btsync name used earlier.
  8. Run: jexec # csh
    [where # is the number from item 7. above]
  9. Run: mkdir /usr/local/btsync
  10. Run: cd /usr/local/btsync
  11. Run: fetch http://download-lb.utorrent.com/endpoint/btsync/os/FreeBSD-x64/track/stable
  12. Run: tar zxvf stable
  13. Run: rm stable
  14. Run: ./btsync –dump-sample-config > btsync.conf
  15. Run: pkg_add -rv nano
  16. Run: nano /usr/local/btsync/btsync.conf
  17. Change the following:
    1. Replace: “device_name”: “My Sync Device”, with a friendly name for your BTsync service, e.g. “device_name”: “Fred”,
    2. Replace: “storage_path” : “/home/user/.sync”, with “storage_path” : “/usr/local/btsync/.sync”,
    3. Replace: “password” : “password” with “password” : “XXXXXXXXXX” where XXXXXXXXXX is a password of your choosing.
  18. Close Nano and save the changes: Ctrl +X -> Y -> Enter
  19. Run: nano /etc/rc.d/btsync
  20. Insert the following:
    #!/bin/sh
    #
    # PROVIDE: btsync
    # REQUIRE: LOGIN DAEMON NETWORKING
    # KEYWORD: shutdown
    #
    # To enable BTSync, add this line to your /etc/rc.conf:
    #
    # btsync_enable="YES"
    #
    # And optionally these line:
    #
    # btsync_user="username" # Default is "root"
    # btsync_bin="/path/to/btsync" # Default is "/usr/local/sbin/btsync"
    
    . /etc/rc.subr
    
    name="btsync"
    rcvar="btsync_enable"
    
    load_rc_config $name
    
    required_files=$btsync_bin
    
    : ${btsync_enable="NO"}
    : ${btsync_user="root"}
    : ${btsync_bin="/usr/local/sbin/btsync"}
    : ${btsync_config="/usr/local/btsync/btsync.conf"}
    
    command=$btsync_bin
    command_args="--config ${btsync_config}"
    run_rc_command "$1"
  21. Close Nano and save the changes: Ctrl +X -> Y -> Enter
  22. Run:  chmod 555 /etc/rc.d/btsync
  23. Run: nano /etc/rc.conf
  24. Insert the following:
    # BitTorrent Sync
    btsync_enable="YES"
    btsync_user="nobody"
  25. Close Nano and save the changes: Ctrl +X -> Y -> Enter
  26. Run: chown -R nobody:nogroup /usr/local/btsync
  27. Run:  mv /usr/local/btsync/btsync /usr/local/sbin/
  28. Run: chown root:wheel /usr/local/sbin/btsync
  29. Login to your FreeNAS systems web interface.
  30. Click: Jails
  31. Stop the btsync jail and start it again.  Bittorrent Sync should now be running.
  32. Click: Edit Jail
  33. Make a note of IP.
  34. Login to your Bittorrent Sync web interface via: XXX.XXX.XXX.XXX:8888
    [Where XXX.XXX.XXX.XXX is the IP from Item 34]

That should about do it.

Some things to remember:

  • You can use the FreeNAS admin interface to mount storage into folders that exist outside of the jail into the jail.
  • Files and folders should all be set to nobody:nogroup as a user/group combination.  This killed off 99.9% of problems I was having.
  • Bittorrent Sync does not seem to update itself at the moment, at least it hasn’t thus far in this configuration.  This could be because it just doesn’t do it on FreeBSD or because I’ve done something stupidly wrong.  Either way you’ll have to watch the version numbers.

FreeNAS 9.1.0 Beta

Brilliant news, FreeNAS 9.1.0 Beta has been released

Will be a while before I get to play with this what with the wedding preparations, house move, new job, etc, etc. but that said I’m really looking forward to:

Improved Plugin Jail subsystem which supports multiple jails and an enhanced UI including enhancements from PC-BSD Warden.

Hopefully this will lead to some serious fun experimenting which will let me separate my current jail (which contains Serviio and other applications) into separate compartments that I can then turn on and off as necessary.

Clean lines edition

So, it’s finally here, after so many years that nobody was counting anyway, I present MYstIC G v5.0 / Clean lines edition.

I won’t bother to even trying to take any credit here.  The site is still running WordPress and now finds itself themed with the very fancy Montezuma theme.

I’ll probably try to bring the Orange back at some point, but no promises!

FreeNAS Jail with Transmission

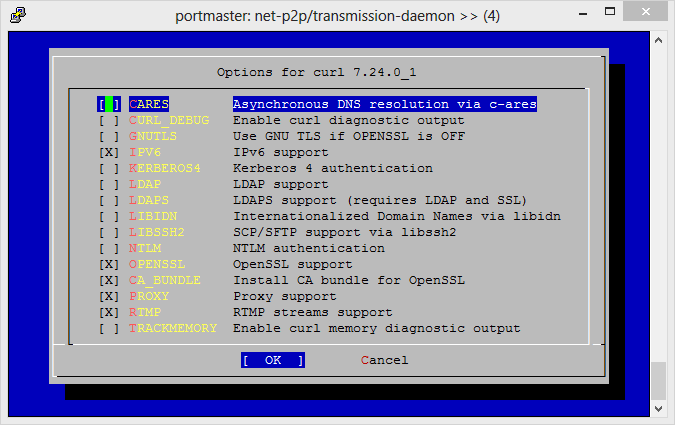
Here are my instructions for creating a FreeNAS Jail with Transmission running inside it. This uses no FreeNAS plugins whatsoever and takes full advantage of all the power that comes with having a FreeBSD core running at the heart of FreeNAS 8.3.

Please note that if you already followed my guide for installing Serviio you can start from item 8.9. below.

  1. Install a plugin Jail as per the instructions available on the FreeNAS wiki here and start the Jail running.
  2. Create a user on your FreeNAS for yourself, e.g. MYUSER
  3. Enable SSH on your FreeNAS and SSH into your FreeNAS install using your client of choice.
  4. Execute the following commands:
    1. SU root
    2. jexec 1 csh
    3. mkdir /home
    4. adduser
  5. When prompted by adduser follow the instructions on-screen to create a user that matches the user you created in Step 2. Make sure that the Uid matches the user you created in Step 2. If you are not sure what the Uid number is then look it up in the FreeNAS control panel. Here’s the example:
    1. Username: MYUSER
      Full name: MYUSER
      Uid (Leave empty for default): 1111
      Login group [MYUSER]:
      Login group is MYUSER. Invite MYUSER into other groups? []: wheel
      Login class [default]:
      Shell (sh csh tcsh nologin) [sh]: csh
      Home directory [/home/MYUSER]:
      Home directory permissions (Leave empty for default):
      Use password-based authentication? [yes]:
      Use an empty password? (yes/no) [no]:
      Use a random password? (yes/no) [no]:
      Enter password:
      Enter password again:
      Lock out the account after creation? [no]:Username : MYUSER
      Password : *****
      Full Name : MYUSER
      Uid : 1111
      Class :
      Groups : MYUSER wheel
      Home : /home/MYUSER
      Home Mode :
      Shell : /bin/csh
      Locked : no
      OK? (yes/no): yes
      adduser: INFO: Successfully added (MYUSER) to the user database.
      Add another user? (yes/no): no
      Goodbye!
  6. Now we need to leave the jail and create a bridge between the FreeNAS internals and the jail. So logout of your SSH client and then turn off the jail in FreeNAS control panel. Then navigate to Services -> Plugins -> Management -> Mount Points and add a new mount point. Map a directory you can access regularly through FreeNAS as the directory /home/MYUSER within the jail. Turn the jail back on and restart your FreeNAS.
  7. SSH into your FreeNAS install using your client of choice.
  8. Execute the following commands [NB: This section will take some time to complete so set aside half an hour]:
    1. SU root
    2. jexec 1 csh
    3. portsnap fetch extract update
    4. cd /usr/ports/ports-mgmt/portmaster/ && make install clean
      Be sure to use the appropriate options for your system. If you’re not sure, check all the boxes.
      Portmaster
    5. echo ‘WITH_PKGNG=yes’ >> /etc/make.conf
    6. rehash
    7. pkg2ng
    8. portmaster -G editors/nano
    9. rehash
    10. cd /usr/ports/ftp/curl
      1. Set the options so that they match the screenshot below:
      2. curl
    11. portmaster -G net-p2p/transmission-daemon
    12. mkdir /home/MYUSER/transmission
    13. mkdir /home/MYUSER/transmission/watch
    14. mkdir /home/MYUSER/transmission/complete
    15. nano /etc/rc.conf and add lines:
      transmission_enable=”YES”
      transmission_watch_dir=”/home/MYUSER/transmission/watch”
      transmission_conf_dir=”/home/MYUSER/transmission”
      transmission_download_dir=”/home/MYUSER/transmission/complete”
      transmission_user=”MYUSER”
    16. rehash
    17. service transmission start
  9. You’re done. Transmission will now start-up on every boot. Login to it remotely and set up the directories you need as necessary!

Time for a rookie mistake

As with all these learning things we do in life it is time for a rookie mistake to be made and I have made it.  Following on from my Starting from scratch with CentOS 6 post I discovered today what can only be called a complete and utter fail in thinking on my latest VPS.  That fail of thinking was…

I DID NOT REMEMBER TO SET THE TIMEZONE

Thankfully this wasn’t a difficult mistake to rectify and after a couple of seconds on google I stumbled upon how2centOS who very simply explain the process required.  So now my updated starting from scratch commands are:

yum install http://www.mirrorservice.org/sites/dl.fedoraproject.org/pub/epel/6/i386/epel-release-6-8.noarch.rpm -y
yum clean all -y
yum update -y
yum install nano -y
ln -sf /usr/share/zoneinfo/Europe/London /etc/localtime

I’ll just have to keep reminding myself that if I want to get good I’ll have to make the rookie mistakes to start with!

Starting from scratch with CentOS 6

As part of my current experiments with VPS servers, here are my notes on starting from scratch with CentOS 6.  This is the standard set of commands that I now run when I’ve wiped a VPS to try the next experiment on it.  I only run them on 64-bit CentOS 6 though so if they don’t work on 32-bit CentoOS 6 then don’t come crying to me!

yum install http://www.mirrorservice.org/sites/dl.fedoraproject.org/pub/epel/6/i386/epel-release-6-8.noarch.rpm -y
yum clean all -y
yum update -y
yum install nano -y

By way of explanation my logic for the above commands is that they install the Extra Packages for Enterprise Linux (EPEL) repository, fully clean out the package manager, bring everything on the system up to date and then install my preferred command line text editor.