FreeNAS 9.1.0 Beta

Brilliant news, FreeNAS 9.1.0 Beta has been released

Will be a while before I get to play with this what with the wedding preparations, house move, new job, etc, etc. but that said I’m really looking forward to:

Improved Plugin Jail subsystem which supports multiple jails and an enhanced UI including enhancements from PC-BSD Warden.

Hopefully this will lead to some serious fun experimenting which will let me separate my current jail (which contains Serviio and other applications) into separate compartments that I can then turn on and off as necessary.
FreeNAS Jail with Serviio 1.1

Here are my instructions for creating a FreeNAS Jail with Serviio 1.1 running inside it. This uses no FreeNAS plugins whatsoever and takes full advantage of all the power that comes with having a FreeBSD core running at the heart of FreeNAS 8.3.

  1. Install a plugin Jail as per the instructions available on the FreeNAS wiki here and start the Jail running.
  2. Create a user on your FreeNAS for yourself, e.g. MYUSER
  3. Enable SSH on your FreeNAS and SSH into your FreeNAS install using your client of choice.
  4. Execute the following commands:
    1. SU root
    2. jexec 1 csh
    3. mkdir /home
    4. adduser
  5. When prompted by adduser follow the instructions on-screen to create a user that matches the user you created in Step 2. Make sure that the Uid matches the user you created in Step 2. If you are not sure what the Uid number is then look it up in the FreeNAS control panel. Here’s the example:
    1. Username: MYUSER
      Full name: MYUSER
      Uid (Leave empty for default): 1111
      Login group [MYUSER]:
      Login group is MYUSER. Invite MYUSER into other groups? []: wheel
      Login class [default]:
      Shell (sh csh tcsh nologin) [sh]: csh
      Home directory [/home/MYUSER]:
      Home directory permissions (Leave empty for default):
      Use password-based authentication? [yes]:
      Use an empty password? (yes/no) [no]:
      Use a random password? (yes/no) [no]:
      Enter password:
      Enter password again:
      Lock out the account after creation? [no]:Username : MYUSER
      Password : *****
      Full Name : MYUSER
      Uid : 1111
      Class :
      Groups : MYUSER wheel
      Home : /home/MYUSER
      Home Mode :
      Shell : /bin/csh
      Locked : no
      OK? (yes/no): yes
      adduser: INFO: Successfully added (MYUSER) to the user database.
      Add another user? (yes/no): no
      Goodbye!
  6. Now we need to leave the jail and create a bridge between the FreeNAS internals and the jail. So logout of your SSH client and then turn off the jail in FreeNAS control panel. Then navigate to Services -> Plugins -> Management -> Mount Points and add a new mount point. Map a directory you can access regularly through FreeNAS as the directory /home/MYUSER within the jail. Turn the jail back on and restart your FreeNAS.
  7. SSH into your FreeNAS install using your client of choice.
  8. Execute the following commands [NB: This section will take some time to complete so set aside a couple of hours]:
    1. SU root
    2. jexec 1 csh
    3. portsnap fetch extract update
      1. Update 02 February 2013
      2. To ensure that you have the new pkg program installed run: pkg -v
      3. If you don’t get a response of 1.0.7 or higher then run: cd /usr/ports/ports-mgmt/pkg/ && make install clean
    4. cd /usr/ports/ports-mgmt/portmaster/ && make install clean
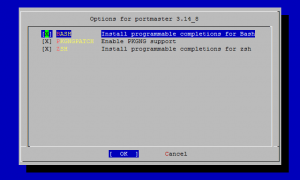
      Be sure to use the appropriate options for your system. If you’re not sure, check all the boxes.
      Portmaster
    5. echo ‘WITH_PKGNG=yes’ >> /etc/make.conf
    6. rehash
    7. pkg2ng
    8. portmaster -G editors/nano
    9. rehash
    10. cd /usr/ports/multimedia/ffmpeg1
    11. make config
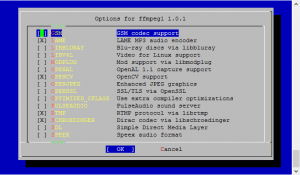
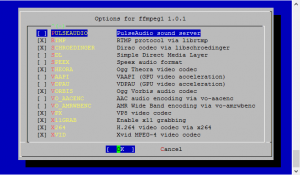
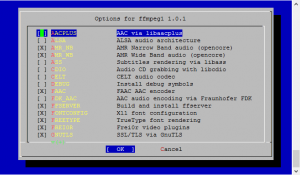
      1. Set the options so that they match the information shown in the Serviio wiki for building ffmpeg. This is complicated so follow the screenshots below:
      2. ffmpeg1-page1
      3. ffmpeg1-page2
      4. ffmpeg1-page3
      5. press ok
    12. cd /usr/ports/graphics/frei0r/
    13. make config
    14. check Enable MMX CPU instructions then press ok
    15. portmaster -G multimedia/ffmpeg1
    16. portmaster -G net/serviio
    17. nano /etc/hosts and add line [replacing Jailed with the name of your jail from the FreeNAS control panel]:
      127.0.0.1 Jailed
    18. nano /etc/rc.conf and add lines:
      serviio_enable=”YES”
      serviio_args=”-Dserviio.remoteHost=192.168.0.100″
    19. service serviio start
  9. You’re done. Serviio will now start-up on every boot. Login to it remotely and set up the directories you need as necessary! I heartily recommend using ServiiDroid for Android which is available here.

FreeNAS, FreeBSD and fucking FFmpeg

Hitting a brick wall when you’re close to getting something finished is one of those things in life that you hope will never happen but generally tends to.  It’s exactly what happened to me yesterday in my quest to make a package for Serviio that I could just install on FreeNAS.

Creating the FreeBSD build environment on my PC seemed as though it would be simple enough, throw up VirtualBox, throw FreeBSD at it and hopefully job done.  In actuality it was even easier than I’d expected when I followed the guide that I found on the FreeNAS forums the other day (see my earlier post).

Problem was that I know absolutely nothing about FreeBSD in general and that after many hours of bashing my head against building FFmpeg it all came down to one simple thing.  I should have rebooted when it all started going wrong!

Live and learn!

That’s LAME

Well, whilst on my mission to make Serviio and FreeNAS live in perfect harmony as simply as possible, I’ve just stumbled upon the fact that LAME has been updated to version 3.99.2.

Does anyone have a summary of the differences / new features  in version 3.99 as the changelog is absolutely enormous and it made my head hurt when I started trying to read it.