FreeNAS Jail with Transmission

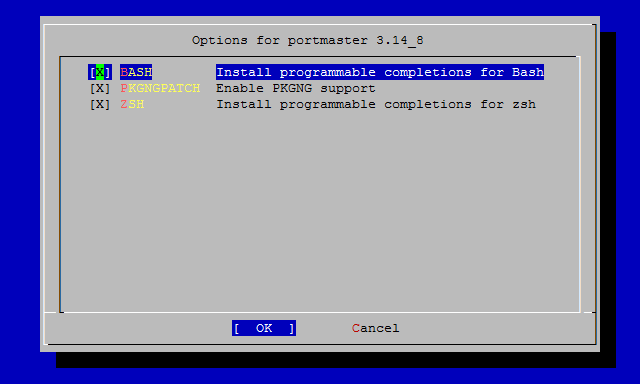
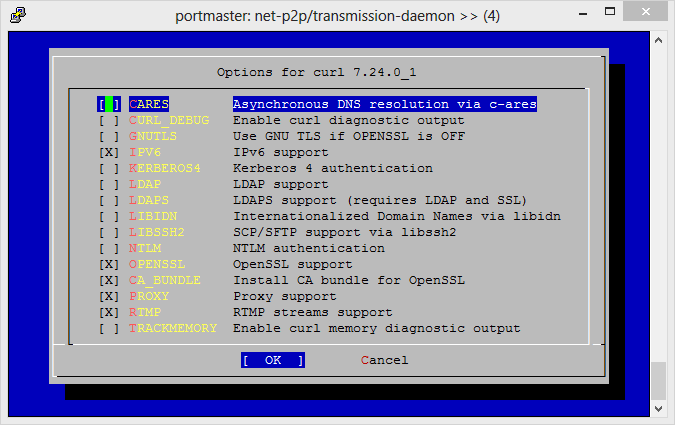
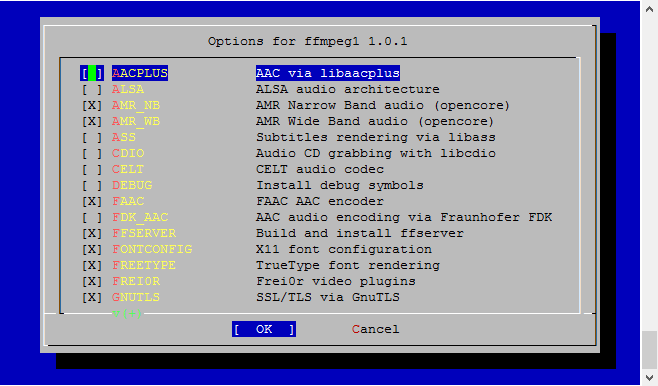
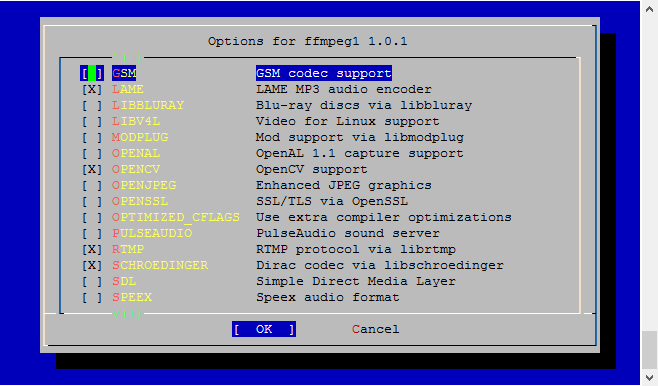
Here are my instructions for creating a FreeNAS Jail with Transmission running inside it. This uses no FreeNAS plugins whatsoever and takes full advantage of all the power that comes with having a FreeBSD core running at the heart of FreeNAS 8.3.

Please note that if you already followed my guide for installing Serviio you can start from item 8.9. below.

  1. Install a plugin Jail as per the instructions available on the FreeNAS wiki here and start the Jail running.
  2. Create a user on your FreeNAS for yourself, e.g. MYUSER
  3. Enable SSH on your FreeNAS and SSH into your FreeNAS install using your client of choice.
  4. Execute the following commands:
    1. SU root
    2. jexec 1 csh
    3. mkdir /home
    4. adduser
  5. When prompted by adduser follow the instructions on-screen to create a user that matches the user you created in Step 2. Make sure that the Uid matches the user you created in Step 2. If you are not sure what the Uid number is then look it up in the FreeNAS control panel. Here’s the example:
    1. Username: MYUSER
      Full name: MYUSER
      Uid (Leave empty for default): 1111
      Login group [MYUSER]:
      Login group is MYUSER. Invite MYUSER into other groups? []: wheel
      Login class [default]:
      Shell (sh csh tcsh nologin) [sh]: csh
      Home directory [/home/MYUSER]:
      Home directory permissions (Leave empty for default):
      Use password-based authentication? [yes]:
      Use an empty password? (yes/no) [no]:
      Use a random password? (yes/no) [no]:
      Enter password:
      Enter password again:
      Lock out the account after creation? [no]:Username : MYUSER
      Password : *****
      Full Name : MYUSER
      Uid : 1111
      Class :
      Groups : MYUSER wheel
      Home : /home/MYUSER
      Home Mode :
      Shell : /bin/csh
      Locked : no
      OK? (yes/no): yes
      adduser: INFO: Successfully added (MYUSER) to the user database.
      Add another user? (yes/no): no
      Goodbye!
  6. Now we need to leave the jail and create a bridge between the FreeNAS internals and the jail. So logout of your SSH client and then turn off the jail in FreeNAS control panel. Then navigate to Services -> Plugins -> Management -> Mount Points and add a new mount point. Map a directory you can access regularly through FreeNAS as the directory /home/MYUSER within the jail. Turn the jail back on and restart your FreeNAS.
  7. SSH into your FreeNAS install using your client of choice.
  8. Execute the following commands [NB: This section will take some time to complete so set aside half an hour]:
    1. SU root
    2. jexec 1 csh
    3. portsnap fetch extract update
    4. cd /usr/ports/ports-mgmt/portmaster/ && make install clean
      Be sure to use the appropriate options for your system. If you’re not sure, check all the boxes.
      Portmaster
    5. echo ‘WITH_PKGNG=yes’ >> /etc/make.conf
    6. rehash
    7. pkg2ng
    8. portmaster -G editors/nano
    9. rehash
    10. cd /usr/ports/ftp/curl
      1. Set the options so that they match the screenshot below:
      2. curl
    11. portmaster -G net-p2p/transmission-daemon
    12. mkdir /home/MYUSER/transmission
    13. mkdir /home/MYUSER/transmission/watch
    14. mkdir /home/MYUSER/transmission/complete
    15. nano /etc/rc.conf and add lines:
      transmission_enable=”YES”
      transmission_watch_dir=”/home/MYUSER/transmission/watch”
      transmission_conf_dir=”/home/MYUSER/transmission”
      transmission_download_dir=”/home/MYUSER/transmission/complete”
      transmission_user=”MYUSER”
    16. rehash
    17. service transmission start
  9. You’re done. Transmission will now start-up on every boot. Login to it remotely and set up the directories you need as necessary!

Time for a rookie mistake

As with all these learning things we do in life it is time for a rookie mistake to be made and I have made it.  Following on from my Starting from scratch with CentOS 6 post I discovered today what can only be called a complete and utter fail in thinking on my latest VPS.  That fail of thinking was…

I DID NOT REMEMBER TO SET THE TIMEZONE

Thankfully this wasn’t a difficult mistake to rectify and after a couple of seconds on google I stumbled upon how2centOS who very simply explain the process required.  So now my updated starting from scratch commands are:

yum install http://www.mirrorservice.org/sites/dl.fedoraproject.org/pub/epel/6/i386/epel-release-6-8.noarch.rpm -y
yum clean all -y
yum update -y
yum install nano -y
ln -sf /usr/share/zoneinfo/Europe/London /etc/localtime

I’ll just have to keep reminding myself that if I want to get good I’ll have to make the rookie mistakes to start with!

Starting from scratch with CentOS 6

As part of my current experiments with VPS servers, here are my notes on starting from scratch with CentOS 6.  This is the standard set of commands that I now run when I’ve wiped a VPS to try the next experiment on it.  I only run them on 64-bit CentOS 6 though so if they don’t work on 32-bit CentoOS 6 then don’t come crying to me!

yum install http://www.mirrorservice.org/sites/dl.fedoraproject.org/pub/epel/6/i386/epel-release-6-8.noarch.rpm -y
yum clean all -y
yum update -y
yum install nano -y

By way of explanation my logic for the above commands is that they install the Extra Packages for Enterprise Linux (EPEL) repository, fully clean out the package manager, bring everything on the system up to date and then install my preferred command line text editor.

FreeNAS Jail with Serviio 1.1

Here are my instructions for creating a FreeNAS Jail with Serviio 1.1 running inside it. This uses no FreeNAS plugins whatsoever and takes full advantage of all the power that comes with having a FreeBSD core running at the heart of FreeNAS 8.3.

  1. Install a plugin Jail as per the instructions available on the FreeNAS wiki here and start the Jail running.
  2. Create a user on your FreeNAS for yourself, e.g. MYUSER
  3. Enable SSH on your FreeNAS and SSH into your FreeNAS install using your client of choice.
  4. Execute the following commands:
    1. SU root
    2. jexec 1 csh
    3. mkdir /home
    4. adduser
  5. When prompted by adduser follow the instructions on-screen to create a user that matches the user you created in Step 2. Make sure that the Uid matches the user you created in Step 2. If you are not sure what the Uid number is then look it up in the FreeNAS control panel. Here’s the example:
    1. Username: MYUSER
      Full name: MYUSER
      Uid (Leave empty for default): 1111
      Login group [MYUSER]:
      Login group is MYUSER. Invite MYUSER into other groups? []: wheel
      Login class [default]:
      Shell (sh csh tcsh nologin) [sh]: csh
      Home directory [/home/MYUSER]:
      Home directory permissions (Leave empty for default):
      Use password-based authentication? [yes]:
      Use an empty password? (yes/no) [no]:
      Use a random password? (yes/no) [no]:
      Enter password:
      Enter password again:
      Lock out the account after creation? [no]:Username : MYUSER
      Password : *****
      Full Name : MYUSER
      Uid : 1111
      Class :
      Groups : MYUSER wheel
      Home : /home/MYUSER
      Home Mode :
      Shell : /bin/csh
      Locked : no
      OK? (yes/no): yes
      adduser: INFO: Successfully added (MYUSER) to the user database.
      Add another user? (yes/no): no
      Goodbye!
  6. Now we need to leave the jail and create a bridge between the FreeNAS internals and the jail. So logout of your SSH client and then turn off the jail in FreeNAS control panel. Then navigate to Services -> Plugins -> Management -> Mount Points and add a new mount point. Map a directory you can access regularly through FreeNAS as the directory /home/MYUSER within the jail. Turn the jail back on and restart your FreeNAS.
  7. SSH into your FreeNAS install using your client of choice.
  8. Execute the following commands [NB: This section will take some time to complete so set aside a couple of hours]:
    1. SU root
    2. jexec 1 csh
    3. portsnap fetch extract update
      1. Update 02 February 2013
      2. To ensure that you have the new pkg program installed run: pkg -v
      3. If you don’t get a response of 1.0.7 or higher then run: cd /usr/ports/ports-mgmt/pkg/ && make install clean
    4. cd /usr/ports/ports-mgmt/portmaster/ && make install clean
      Be sure to use the appropriate options for your system. If you’re not sure, check all the boxes.
      Portmaster
    5. echo ‘WITH_PKGNG=yes’ >> /etc/make.conf
    6. rehash
    7. pkg2ng
    8. portmaster -G editors/nano
    9. rehash
    10. cd /usr/ports/multimedia/ffmpeg1
    11. make config
      1. Set the options so that they match the information shown in the Serviio wiki for building ffmpeg. This is complicated so follow the screenshots below:
      2. ffmpeg1-page1
      3. ffmpeg1-page2
      4. ffmpeg1-page3
      5. press ok
    12. cd /usr/ports/graphics/frei0r/
    13. make config
    14. check Enable MMX CPU instructions then press ok
    15. portmaster -G multimedia/ffmpeg1
    16. portmaster -G net/serviio
    17. nano /etc/hosts and add line [replacing Jailed with the name of your jail from the FreeNAS control panel]:
      127.0.0.1 Jailed
    18. nano /etc/rc.conf and add lines:
      serviio_enable=”YES”
      serviio_args=”-Dserviio.remoteHost=192.168.0.100″
    19. service serviio start
  9. You’re done. Serviio will now start-up on every boot. Login to it remotely and set up the directories you need as necessary! I heartily recommend using ServiiDroid for Android which is available here.

Replacing Hamachi with NeoRouter

So what is NeoRouter?

For me personally the sand timer has been running on Hamachi for some time.  Its support for different platforms doesn’t do it for me anymore, especially with respect to FreeBSD and Linux.  The policy changes have also made it progressively more difficult for me as a personal user to rely upon it.

The problem was that for an incredibly long time there was nothing to replace it with that offered a similar functionality which was just as simple to use.  Well unfortunately for Hamachi the last grain of sand has fallen to the bottom because I have found a suitable alternative.  This week I will be replacing Hamachi with NeoRouter.

Without doing a full blow-by-blow comparison (because there is one here on the NeoRouter website) my reasons for switching are:

  • NeoRouter will allow me to have up to 256 clients.  This is a vast improvement on the 5 device limit per group with Hamachi.
  • FreeBSD Support.  Incredibly important now I’m so heavily into the greatness that is FreeNAS.
  • Linux Support.  Whilst Hamachi did have this it was utterly awkward and unusable.
  • 32-bit and 64-bit versions for the Unix based operating systems.
  • Android Support.  Software support like this is what normally gives me pause for thought when contemplating moving away from my reliable iPhone.
  • ARM version under development.  This could be incredibly useful if the RaspberryPi continues to increase in popularity.
  • OpenWrt and Tomato router firmwares support NeoRouter being installed.
  • Controlable central server.  You run a server, you connect your clients to the server, it works.

Having had NeoRouter in place for some months now I’ve had no reason to look back.  It’s time to ditch Hamachi folks!

Leftovers from 2012

What better way to start posting updates for 2013 than by using leftovers from 2012 that are rattling around in my noggin.  Actually there are probably hundreds of better ways but to hell with that!

  • Google Zeitgeist for the United Kingdom for 2012 – Big Bang Theory in the Top 5 for TV Shows… BAZINGA!
  • Again on the Zeitgeist, Google insisting that Project Glass was a thing when it totally wasn’t.  It is and shall remain totally fucking retarded.
  • Who came up with the stupid plan that we should all buy High Definition Televisions so shortly afterwards all the programming broadcast could include as many of the god awful low resolution camara phone clips available on YouTube as possible?  Whoever it was is a complete bastard.
  • What happened to the Steam Holiday Sale it is so awful this year.

Borderlands 2

Borderlands 2 has to take the cake as my game of 2012.  Whilst it’s not the best First Person Shooter ever made it comes pretty damn close, mostly because of its awesome sense of humour that permeates throughout the game.  Here’s an absolute mound of screenshots from my adventures on Pandora, enjoy!

Messing with CentOS6 on MiniVPS

So, the clock ticked on and we arrived at renewal time for the Real Private Server [RPS] which I’ve had for a couple of years with OVH.  The RPS hadn’t been performing well recently which was starting annoy me.  It also didn’t help that the Release 2 operating system by OVH is based on Gentoo which fairly well excluded any possibility of me being able to tinker with it successfully.

So, after a visit to LowEndBox I decided to take out a Virtual Private Server [VPS] with MiniVPS as it seemed like an inexpensive way of keeping a web-based server box that I could tinker with and break as much as I wanted because I’d already moved all the important stuff (websites, DNS, mail, etc) elsewhere.

After picking a new domain name that I could break repeatedly I signed up with MiniVPS.  Within minutes the VPS was up and running with 64-bit CentOS6.  It was time to begin my introduction to CentOS6 the hard way!

First port of call, install remote administration software that would make my life easier on a day-to-day basis (everybody loves a web interface).  I’d encountered Webmin before because it was installed on the OVH RPS so it seemed like a logical place to start.  After some reading it seemed that I needed to install the YUM repository to accomplish my goal.  Well, that was easier said than done.  Not because installing the repository was difficult but because my favourite command line editor GNU Nano wasn’t installed. After a few minutes searching I hit upon

yum install nano

which after using putty to SSH into the box worked like a charm. For a follow-up the necessary repo content was added using

nano /etc/yum.repos.d/webmin.repo

and after following the remaining instructions on the Webmin site. After about 10 minutes I was able to hit

yum install webmin

and voilà, job done. So far so good!

History of New Romulus

It appears that there may be some, err… details missing from the latest patch for Star Trek Online when it comes to the History of New Romulus

Someone at Cryptic care to copy and paste the text please!